Marconi Router Admin Setup: Marconi wireless and wired router have gone trendy over time and they started as the traditional unit of the wired router but they have slowly picked up the pace becoming a prominent router company in the world.
Similar to any other router, even this brand has released a lot of router models but this brand has updated each and every router to the very best from scratch that makes the present models the best in terms of quality and features as well. Marconi router model X7721r is the most famous one across all the other models that have been released in the market till now.

How to setup Marconi Router – Marconi Router Configuration Process
We will be using the model X7721r in order to show you the router configuration process, since all other router models under this brand follow the same interface as well. So, make sure you have made the hardware connections properly and then continue with the below instructions.
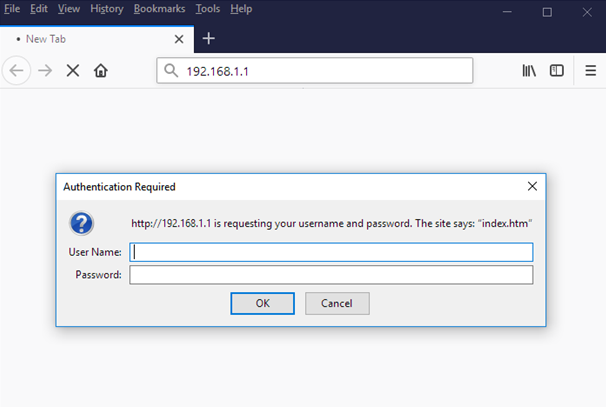
- Step 1: First open the browser and then enter the IP address 192.168.0.1 in the address bar, then click on the continue button or either the go button
- Step 2: This will now load the router login panel, where you will have to enter the required login information.
- Step 3: The username and the password will be both unknown, which entered, you have to click on the login button and this will give you access to the admin panel.

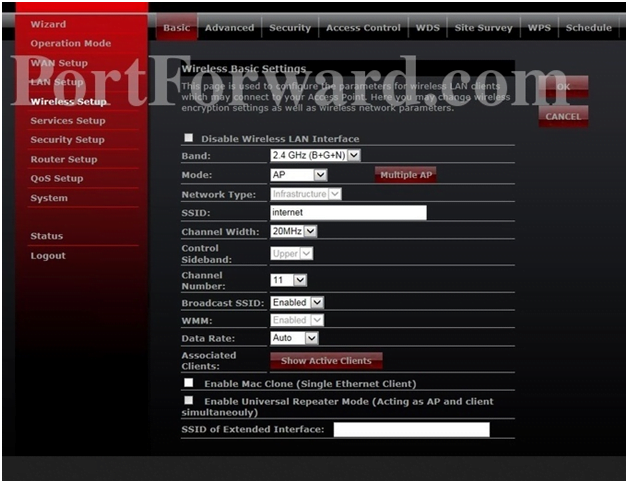
- Step 4: Now go to the Wireless setup from the left sidebar and then click on the Basic tab from the top menu and then make the below suggested changes.
- Band: Select “2.4 GHz (B+G+N)” from the drop-down menu
- Mode: Select “AP” from the drop-down options
- Network Type: Do not select anything here
- SSID: You have to enter your router network name and this can be as per your own preference
- Channel Width: Select “20MHz” from the drop-down menu options
- Control Sideband: Do not make any changes here
- Channel Number: Select “11” from the drop-down menu options
- Broadcast SSID: Select “Enabled” option from the drop-down menu
- WMM: Do not make any changes here
- Data Rate: Select “Auto” option from the drop-down menu and click on the save button.

- Step 5: Now go to the Advanced from the top menu after selecting the Wireless setup from the left sidebar, then you have to make the changes as per the instructions below.
- Fragment Threshold: Enter “2346” here
- RTS Threshold: Enter “2347” here
- Beacon Interval: Enter “100” here
- Preamble Type: Select “Long Preamble”
- IAPP: Select “Enabled” here
- Protection: Select “Disabled” here
- Aggregation: Select “Enabled” here
- WLAN Partition: Select “Disabled” here
- STBC: Select “Disabled” here
- 20/40MHz Coexist: Select “Disabled” here
- RF Output Power: Select “100%” and finally click on the ok button which will save all the settings.
In this way, anyone will be able to configure the Marconi router in quick 5 minutes and all they have to do is follow the above instructions carefully.
What is the Default IP for Marconi Router Admin Login?
The Marconi Router has designated 192.168.0.1 as their Wifi Marconi Router Default Login IP address for accessing the admin panel, and they have kept the default IP in their user guides and on the Marconi Router.
What is the Default Username for Marconi Router Admin Login?
The default admin username may be created by the admin, and the Marconi Router Admin Username is ‘ami’ for logging into the Marconi Router Admin Panel.
What is the Default Password for Marconi Router Admin Login?
The default admin Password may be created by admin, and the Marconi Router Admin password is ‘blank’ for logging into the Marconi Router Admin Panel.
How do I change/Reset the admin username or password of Marconi Router device?
The only way to gain access to the web management system if the administrator password is lost or forgotten is to reset the Marconi Router settings to factory defaults. To reset the password, the user must push and hold the reset button for at least 20 seconds.