Pentagram Router Setup: Pentagram is a massively popular router company that is known for having good speed performance and effective at using bandwidth as well. All their router models are quite well made with the design and performance that their users like. Even their pricing is quite reasonable for a company of that value. In this article, we will guide you on how you can configure the Pentagram router from very scratch so that you can easily do the same.
How to Configure Pentagram Router from start – Pentagram Router settings process
Before you get into the router’s configuration process you should go over the steps below to show you the access to the admin panel first.
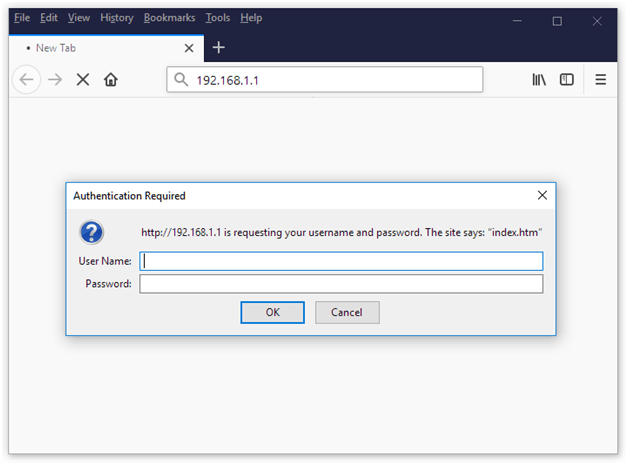
- Open the browser and then go to the address bar, then type the IP address 192.168.1.1 and click on the go option or else on the enter button
- This will load up the login window and then simply enter the username and the password as admin and pentagram
- Once you have entered the details click on the login button and this will get you access right to the Pentagram web configuration panel through which you can do the further settings.
Pentagram Router Wireless Configuration – Internal Settings
One of the important aspects is that once you get into the router admin panel then you have to do the wireless configuration process so that it enables you to enable the wireless process as shown from the below settings.
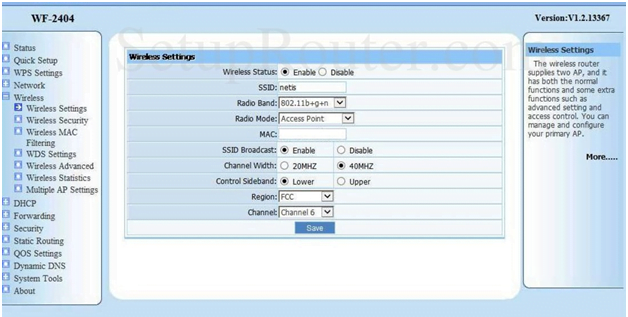
Wireless Settings: Click on the Wireless option from the left sidebar and then make the changes as per the settings shown below.
- Wireless Status: Select the “Enable” option
- SSID: Here enter the name for your router network here and make sure that the router name does not go over 64 characters
- Radio Band: Select “802.11b+g+n” option
- Radio Mode: Select the “Access Point” option
- MAC: Do not enter anything here
- SSID Broadcast: Select the “Enable” option
- Channel Width: Select the “40MHZ” option
- Control Sideband: Select the “Lower” option
- Region: Select “FCC” option
- Channel: Select the “Channel 6” option and then click on the Save button
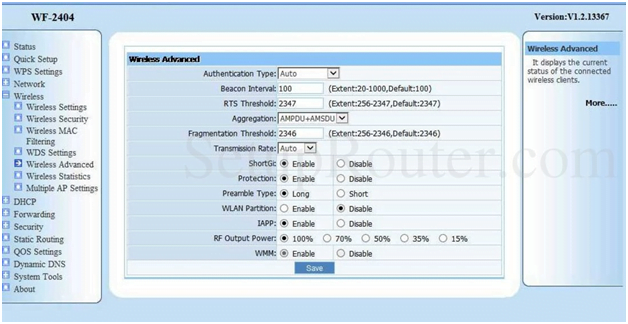
WiFi Advanced Settings: Make the changes for the Advanced settings as per the instructions below.
- Authentication Type: Select the “Auto” option
- Beacon Interval: Enter “100”
- RTS Threshold: Enter “2347”
- Aggregation: Select the “AMPDU+AMSDU” option
- Fragmentation Threshold: Enter “2346”
- Transmission Rate: Select the “Auto” option
- ShortGI: Select “Enable”
- Protection: Select “Enable”
- Preamble Type: Select “Long”
- WLAN Partition: Select “Disable”
- IAPP: Select “Enable”
- RF Output Power: Select “100%”
- WMM: Select “Enable” and then click on the Save button to continue forward
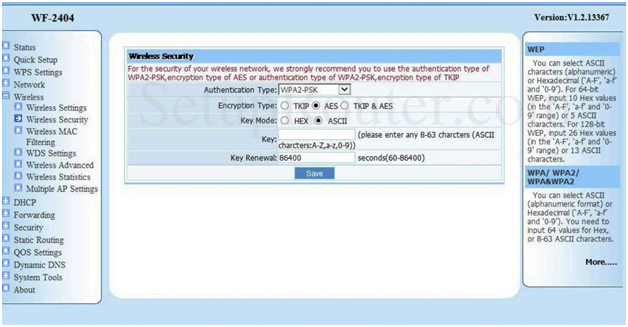
Wireless Security Settings: From the left sidebar click on the Wireless Security option and then on this page you have to make the settings as per the steps shown below.
- Authentication Type: Select “WPA2-PSK” option
- Encryption Type: Select “AES’ option
- Key Mode: Select the “ASCII” option
- Key: Enter the password here and it should not be more than 63 characters long and not less than 8 characters long
- Key Renewal: Enter “86400” and then click on the Save button to make the settings
Following the above instructions step by step will help you to configure the Pentagram router easily.
What is the Default IP for Pentagram Router Login?
The Pentagram Router has designated 192.168.1.1 as their Wifi Pentagram Router Default Login IP address for accessing the admin panel, and they have kept the default IP in their user guides and on the Pentagram Router.
What is the Default Username for Pentagram Router Login?
The Pentagram Router Username is ‘admin’ for entering into the Pentagram Router Panel, and the default admin username can be changed by the admin.
What is the Default Password for Pentagram Router Login?
The Pentagram Router password is ‘admin’ for entering into the Pentagram Router Panel, and the default admin password can be changed by admin.
How do I change/Reset the admin username or password of Pentagram Router device?
The only way to gain access to the web management system if the administrator password is lost or forgotten is to reset the Pentagram Router settings to factory defaults. To reset the password, the user must push and hold the reset button for at least 20 seconds.