Medion Router Setup: Medion might not be a name you might have heard but this is a famous electronic brand which is owned by Lenovo and operates in the United States, Europe, and Asia regions as well. It is well known for being a standalone brand in the electronic industry and has made quite a name for itself by releasing products in every category which includes computers, laptops, notebooks, and routers to accompany them as well.
Medion over the period of time has released quite a few router models in the past and among them the MD router model series has received good recognition by the fans and critics over time. Before you get into the below guide, you have to ensure that the Medion router hardware settings and wire management is done properly with Internet flowing and power supply connected properly as well.
How to Configure Medion Router – Medion Router setup Process
In this article, we will go over one of the Medion MD 40900 router models so that you will be able to learn the configuration process. Note that all the other router models under this brand follow the same configuration and the GUI is the same as this model, which is why we will be using it for the process below.
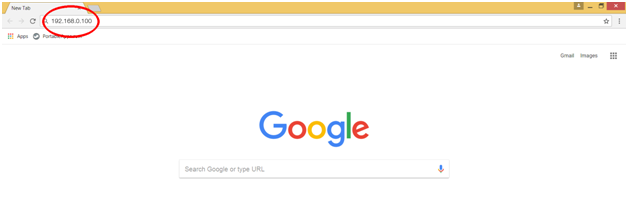
- The Internal IP address is 192.168.0.1 or mostly 192.168.0.100, go to the address bar of any of the selected browser from either your laptop or computer connected to the router via Ethernet cable and then click on enter or go button
- In this step, you have to enter the username and the password in the given login boxes under the same name. For the username enter admin and the for the password enter medion.
- Next click on the login button at the bottom which will now give you access to the admin panel
Medion Router Internal Configuration – How to setup Wireless settings
If you want your router to work as WiFi as well then go over the instructions below to configure and set up your router properly.
WiFi – Basic Settings: Go to the WiFi option from the top menu section and under this click on the “Basic WiFi Network” option and then make the changes as per the below instructions.
- Network mode: Select the “Mixed” option here
- Network Name (SSID): Enter your preferred name as per your preference here and this will be your router’s network name
- Standard Channel, under this for SSID Broadcast, select the “Enabled” option and then click on the Save Settings option to continue.

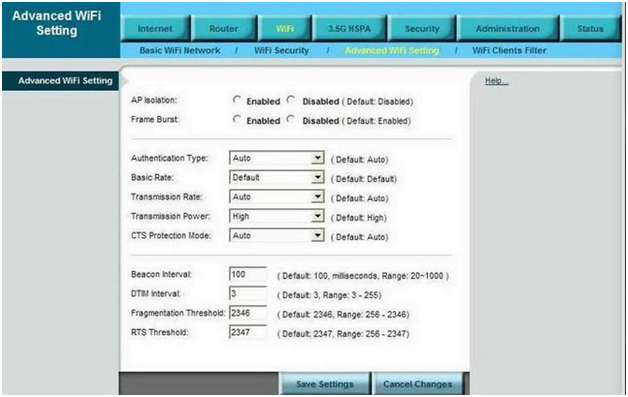
WiFi – Advanced Settings: Go to the WiFi option from the top menu and then click on “Advanced WiFi Settings” and make the changes as per the instructions below.
- AP Isolation: Select “Enabled” option
- Frame Burst: Select “Enabled” option
- Authentication Type: Select “Auto” option
- Basic Rate: Select “Default” option
- Transmission Rate: Select “Auto” option
- Transmission Power: Select “High” option
- CTS Protection Mode: Select “Auto” option
- Beacon Interval: Enter “100” here
- DTM Interval: Enter “3” here
- Fragmentation Threshold: Enter “2346” here
- RTS Threshold: Enter “2347” here and then click on the Save Settings options to make the changes.
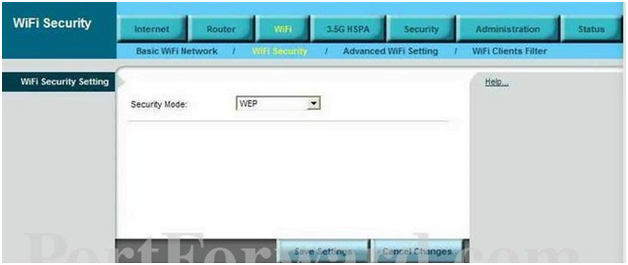
WiFi – Security Settings: Go to the WiFi option again from the top menu section and then click on the “WiFi Security” option, then make the changes as per the given steps below.
- Security Mode: Select the “WEP” option
- Then you have to click on the Save Settings button and on the next page enter the password.
- After entering the password, make sure it is 8 characters long at least, and then finally click on the Save Settings button.
What is the Default IP for Medion Router Admin Login?
The Medion Router has designated 192.168.0.100 as their Wifi Medion Router Default Login IP address for accessing the admin panel, and they have kept the default IP in their user guides and on the Medion Router.
What is the Default Username for Medion Router Admin Login?
The Medion Router Admin Username is ‘admin’ for entering into the Medion Router Admin Panel, and the default admin username can be changed by the admin.
What is the Default Password for Medion Router Admin Login?
The Medion Router Admin password is ‘medion’ for entering into the Medion Router Admin Panel, and the default admin password can be changed by the admin.
How do I configuration of Medion Router device?
If the administrator password is lost or forgotten, the only method to get access to the web management system is to reset the Medion Router configuration to factory defaults. Users can press and hold the reset button for at least 20 seconds to reset the password.