IMAI Router Setup: IMAI is a reasonable brand when it comes to quality products in the field of routers. One of the key features is that the dual gain-bandwidth allocation has piqued the interest of the users a lot. You need to know among all the routers from this brand, two have done exceptionally well in terms of both speed and performance which is why I will be reviewing one of these routers to better explain the configuration process here.

How to Setup IMAI Router Configuration Online – IP 192.168.1.1
There are going to be a lot of steps involved if you want to properly configure a router from IAMI but you have to make sure that each and every step is followed correctly.
- So the first thing to do is open the Internal IP address which is IP 192.168.1.1 and then type the same into the address bar of a browser that you have selected

- Now, after this step, you will see that a sudden popup will appear on the screen which will ask to enter the login information to get access to the admin panel
- Here you will have to enter the username and the password which is admin and 12345 respectively. Once you are done, click on the login button which will start the loading of the admin panel.
- Username is admin
- Password is 12345
Now, we wait till the admin panel will load and if you are following this setup guide for the first time, it might take a few minutes for the configuration panel to load.
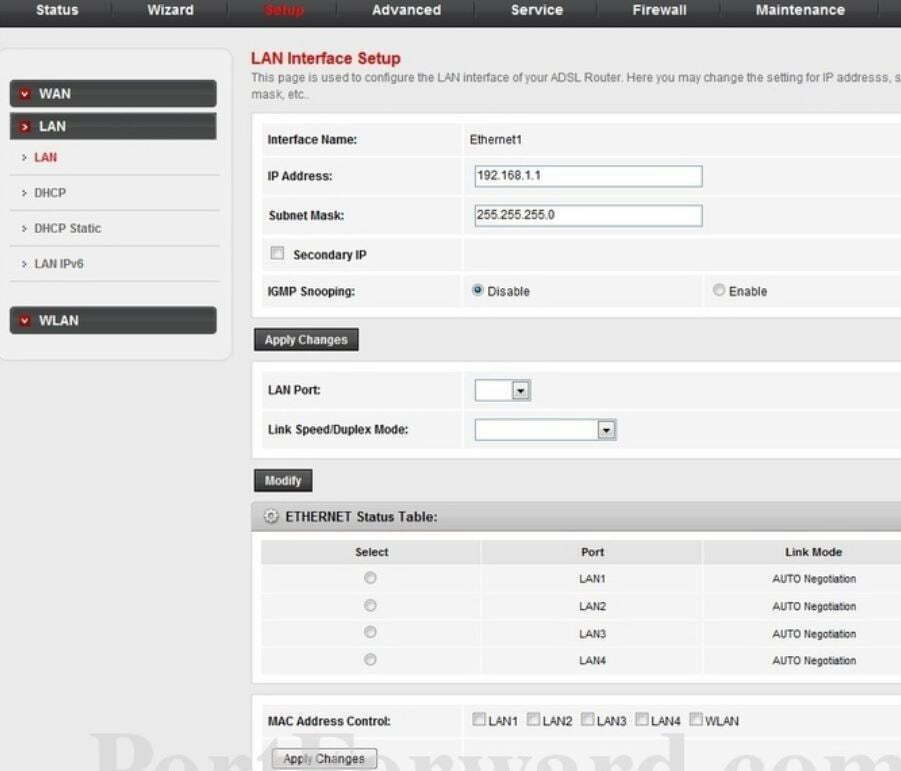
- LAN Interface Setup: First we need to click on the “LAN” section and then select “LAN” under this page by the name “LAN Interface Setup” you will have to follow basic settings as below.
- IP Address: This will be 192.168.1.1
- Subnet Mask: This will auto-populate itself and you do not have to edit it anyway
- Now after that simply click on the “Apply Changes” button and the settings will be saved right away.

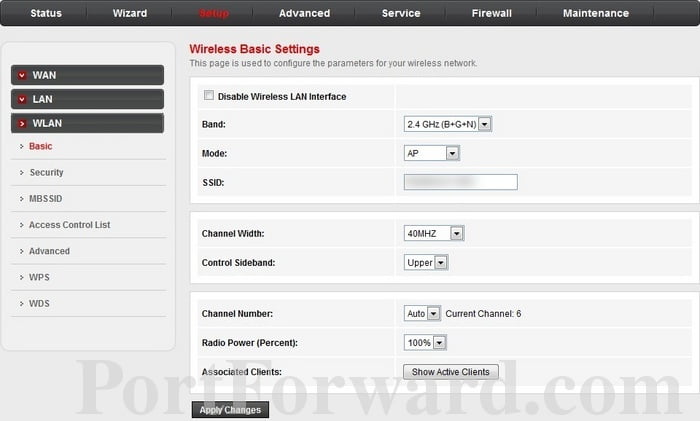
- Wireless Basic Settings: We have to enable the wireless settings and in order to do so go to “WLAN” and then go “Basic” and under this you will have to make the settings as shown below.
- Band: 2.4Ghz(B+G+N), select this option from the drop-down menu
- Mode: AP, you can select this option from the drop-down directly
- SSID: Here you will have to enter the name for your router’s network which we will be seeing when searching for Wi-Fi
- Channel Width: 40MHZ
- Control Sideband: Upper
- Channel Number: Auto
- Radio Power (Percent): 100%
- Associated Clients: You do not have to make any changes here
- Once the settings have been done properly, you can simply click on the “Apply Changes” button at the bottom.

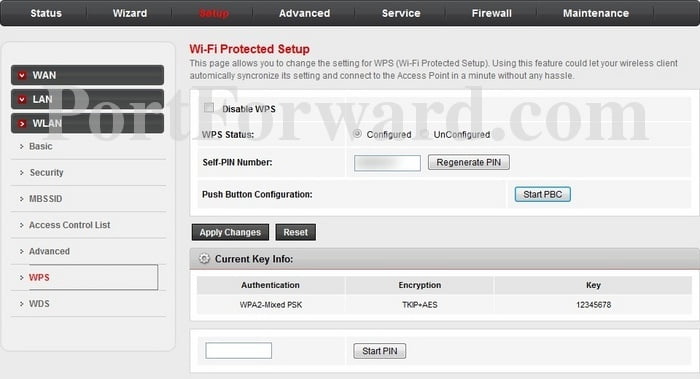
- Wi-Fi Protected Setup: Then under “WLAN” go-to “WPS” and simply click on “WPS Status” as configured and enter a PIN number under “Self-PIN Number” and click on the “Apply Changes” button for settings to be saved.

In this way, you will be able to easily configure the IMAI router with access to the wireless connection and password protection for WiFi as well.
What is the Default IP for IMAI Router Login?
The IMAI Router has defined their Wifi IMAI Router Default Login IP address 192.168.1.1 to login the admin panel, and they have maintained the default IP at their user manuals along with stick a label on the IMAI Router.
What is the Default Username for IMAI Router Login?
The default admin username may be created by the admin, and the IMAI Router Username is ‘admin’ for logging into the IMAI Router Panel.
What is the Default Password for IMAI Router Login?
The default admin Password may be created by the admin, and the IMAI Router password is ‘12345’ for logging into the IMAI Router Panel.
How do I change/Reset the admin username or password of IMAI Router device?
If the administrator password is lost or forgotten, the only method to get access to the web management system is to reset the IMAI Router configuration to factory defaults. Users can press and hold the reset button for at least 20 seconds to reset the password.