Longshine Router Setup: Another European brand that is famous in the region of European countries and this brand has been excessively used in many offices, institutes, and homes as well. One of the reasons why it has become famous even though the brand is practically small is because they delivered robust products at the same time the after service was good which made the local and the nearby region-based customers buy more of the router products. In today’s article, we will be going over the router flagship model and show you the further configuration process to help the brand users.
How to setup Longshine Router Configuration Guide
Every router should be made sure to have proper hardware connection to begin and along with that all the brands come up with an Internal IP address that corresponds to their web configuration panel online.
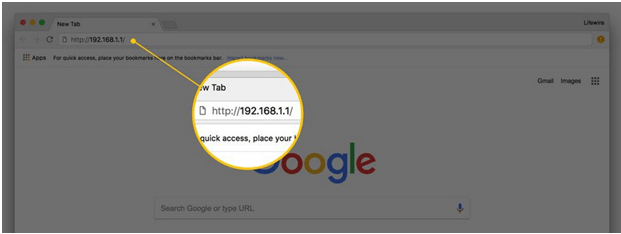
- First, you will open any browser and then enter the IP address 192.168.1.1 in the address bar and click on go
- Now wait as the window will load and a login popup will show where you have to enter the username and the password. For the username, enter “admin” and for the password user “1234”, then click on the login button to continue to the next step.
- Here you will see that the admin panel homepage will load and this is the web configuration panel through which we can make further settings.
Router Wireless Configuration Process – How to setup Internal settings
We have access to the admin panel right now and you can follow the below steps to know how to configure the router internally in quick time and properly as well so that no further errors occur if you are going to set up the router yourself in the future.
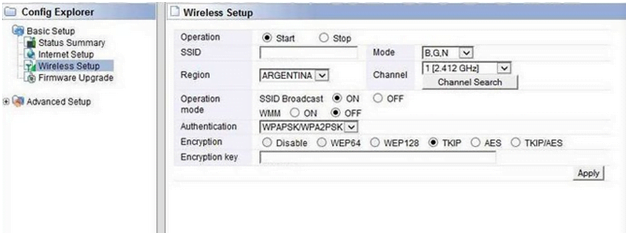
Wireless Setup: Go to the left sidebar and click on the Basic Setup, under which you have to select “Wireless Setup” and then make the below instruction changes.
- Operation: Start
- SSID: Enter the router network name and this can be done as per your own preference
- Region: Select your country
- Operation Mode: SSID Broadcast, ON
- Authentication: WPAPSK/WPA2PSK
- Encryption: TKIP
- Encryption Key: Do not add anything here
- Mode: B.G.N
- Channel: 1 [2.412 GHz] and click on the apply button.
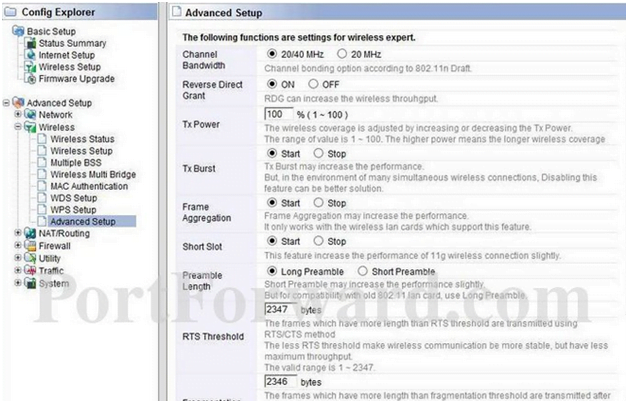
Advanced Setup: Now go to the Advanced Setup from the left sidebar and then click on the Wireless option, under it click on the “Advanced Setup” and make the changes shown below.
- Channel Bandwidth: 20/40 MHz
- Reverse Direct Grant: ON
- Tx Power: 100
- Tx Burst: Start
- Frame Aggregation: Start
- Shorty Slot: Start
- Preamble Length: Long Preamble and 2347
- RTS Threshold: 2346 and then click on the Save button for the settings to be saved.
WPS Setup: Now go to the Advanced Setup and click on the wireless option and under it select the “WPS Setup” and make the changes as per the below instructions.
- Click on the “Add Wireless device” option and under this you have to select the SSID name which you have created in the Basic setup process above.
- After that select, the “Allow wireless configuration to be changed” option and then you will have to add a password for your router network.
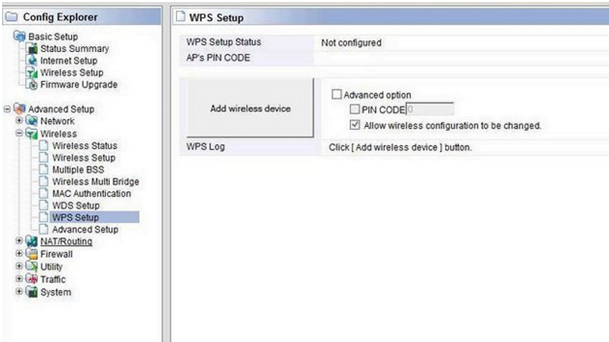
Once done click on the Save button and then you have now completely setup the Longshine router.
What is the Default IP for Longshine Router Admin Login?
The Longshine Router has designated 192.168.1.1 as their Wifi Longshine Router Default Login IP address for accessing the admin panel, and they have kept the default IP in their user guides and on the Longshine Router.
What is the Default Username for Longshine Router Admin Login?
The Longshine Router Admin Username is ‘admin’ for entering into the Longshine Router Admin Panel, and the default admin username can be changed by the admin.
What is the Default Password for Longshine Router Admin Login?
The Longshine Router Admin password is ‘1234’ for entering into the Longshine Router Admin Panel, and the default admin password can be changed by admin.
How do I configuration of Longshine Router device?
If the administrator password is lost or forgotten, the only method to get access to the web management system is to reset the Longshine Router configuration to factory defaults. Users can press and hold the reset button for at least 20 seconds to reset the password.