Megastar Router Admin Setup: It might not be a router brand that you might have heard a lot about in the past or now as well but this brand is something that you must look forward to when it comes to the router industry. They do not only excel in creating routers but also have enough expertise and reach in different industries and products such as Network infrastructure, Data center solutions, switches, wireless routers, VPS, and many more that are very much required for a computer networking brand. One of the key reasons why their router models have been successful is because they create models with robust features such as high speed, performance, and even effective use of the bandwidth is really considered and given the highest priority so that the fans use this would be amazing.
How to Configure Megastar Router – Megastar Router Setup Process
Before you configure the router you will need to have access to the Megastar router admin panel and in the instructions below you will find all the information and steps to get the access.
- Step 1: Open a browser from your laptop or computer which is connected to the router via an ethernet cable. Then, go to the address bar of the selected browser and then enter the IP Address 192.168.1.1 and then simply click on the enter or go button to continue.
- Step 2: On the same window you will see a login popup will appear with two fields to be filled and a login button at the bottom. On this page, you will simply have to enter the username and the password which are admin and 1234 respectively.
- Step 3: Then click on the login button present at the bottom of the page and then you will now have access to the router admin panel.
How to enable Wireless settings and Router Internal Settings
Now you can follow the instructions below in order to configure the router with the required internal settings to enable a wireless connection.
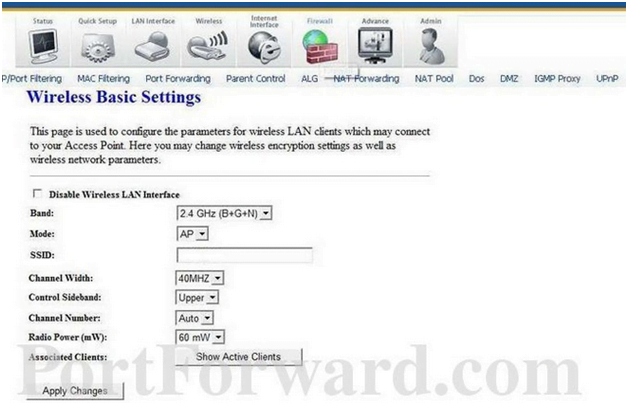
Wireless Basic Settings: First you have to make the basic settings which you can open via clicking on the Wireless option from the top menu section and then click on the Basic settings option.
- Do not check the option “Disable Wireless LAN Interface” option
- Band: Select the “2.4 GHz (B+G+N)” option
- Mode: Select the “AP” option
- SSID: Enter your router network name and this can be as per your preference.
- Channel Width: Select the “40MHZ” option
- Control Sideband: Select the “Upper” option here
- Channel Number: Select “Auto” option here
- Radio Power (mW): Select the “60 mW” option here
- Associated Clients: Do not click on the option “Show Active Clients” and simply click on the Apply Changes button.
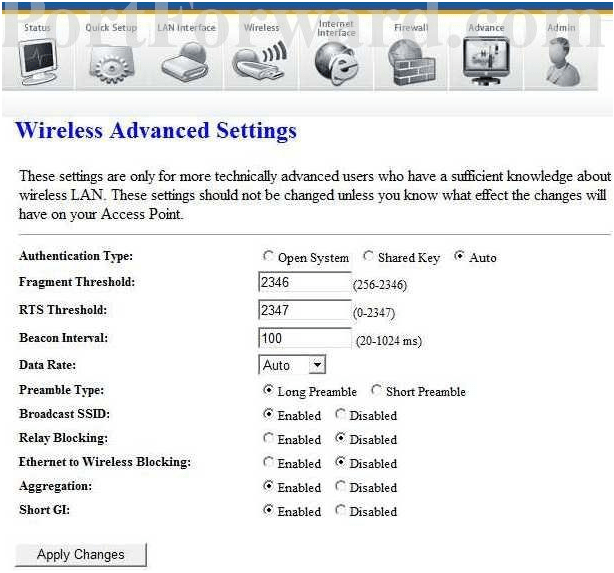
Wireless Advanced Settings: Once you are done with the basic settings, move towards the Advanced Settings page from the Wireless option from the top menu section and then make the changes as per the below instructions.
- Authentication Type: Select the “Auto” option here
- Fragment Threshold: Enter the “2346” number here
- RTS Threshold: Enter the “2347” number here
- Beacon Interval: Enter the “100” number here
- Data Rate: Select the “Auto” option here
- Preamble Type: Select “Long Preamble”
- Broadcast SSID: Select the “Enabled” option
- Relay Blocking: Select the “Disabled” option
- Ethernet to Wireless Blocking: Select the “Disabled” option
- Aggregation: Select the “Enabled” option
- Short GI: Select the “Enabled” option and then click on the Apply Changes button to make the changes.
Finally, now the Megastar Router Admin is configured successfully and you can follow the same instructions to make the configuration yourself as well by following the above guide properly.
What is the Default IP for Megastar Router Admin Login?
The Megastar Router has defined their Wifi Megastar Router Default Login IP address 192.168.1.1 to login the admin panel, and they have maintained the default IP at their user manuals along with stick a label on the Megastar Router.
What is the Default Username for Megastar Router Admin Login?
The default admin username may be created by the admin, and the Megastar Router Admin Username is ‘admin’ for logging into the Megastar Router Admin Panel.
What is the Default Password for Megastar Router Admin Login?
The default admin Password may be created by the admin, and the Megastar Router Admin password is ‘1234’ for logging into the Megastar Router Admin Panel.
How do I change/Reset the admin username or password of Megastar Router device?
The only way to gain access to the web management system if the administrator password is lost or forgotten is to reset the Megastar Router settings to factory defaults. To reset the password, the user must push and hold the reset button for at least 20 seconds.