Mercury Router Setup: Mercury is an agile router brand that works mostly with the release of new products that come up dual gain bandwidth and effective usage of the bandwidth. At the same time, the reason this brand became popular is due to their reliable cost-effective product models that everyone from Homes to big companies can buy and use in daily life as well. There are many models that you might be interested in this brand. The reasons are many since they are low on cost and the speed performance has made things easier for them. In this article, we will be going over the steps required to see how you can configure the Mercury router right away.
How to setup Mercury Router – Mercury Router Configuration Process
So once the hardware connection is setup, make sure that the wires are properly managed and the connection is secure and then start with the below instructions or else you will face error while we configure the router.
- Step 1: First open any of the browsers and then go to the address bar, then enter the IP address 192.168.1.1 which is their Internal IP address
- Step 2: Then click on the enter button and this will now load the router login page where you will need to enter the username and the password.
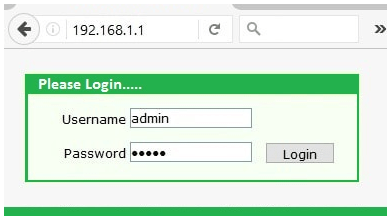
- Step 3: Simply enter the username and the password, both as admin and then click on the login button at the bottom of the page which will provide you access to the router admin panel.
After this step, you will now be on the homepage of the router through which you can not only set up the routers but do more than just minute settings.
Mercury Admin Wireless Connection Setup – Internal Configuration Guide
Follow the instructions below so that you can understand how to configure the router precisely from the start.
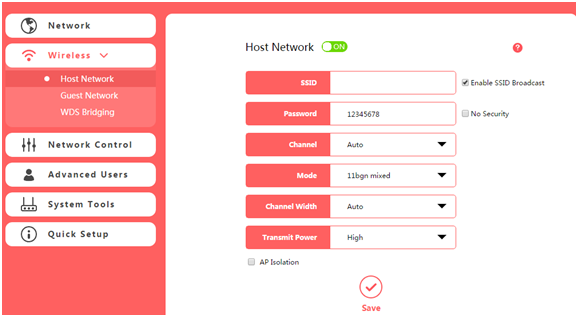
Step 4: On the router homepage, simply click on the Wireless option from the left sidebar and then under this select “Host Network” option and on this page make the below said changes.
- SSID: Enter your router network name here which can be added as per your own preference and can be a combination of alphabets, numerical and special characters as well
- Also, check the option “Enable SSID Broadcast” option
- Password: Here enter the password for your router network and this can be added as per your preference, but make sure this is a strong password with at least 8 characters long.
- Channel: Select the “Auto” option here
- Mode: Select the “11bgn mixed” option here
- Channel Width: Select the “Auto” option here
- Transmit Power: Select the “High” option here and then simply click on the Save button
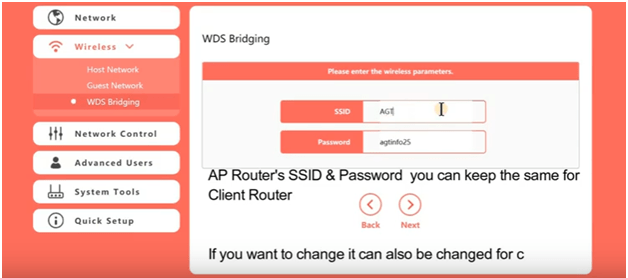
Step 5: After that go to the Wireless option from the left sidebar again and this time, click on the “WDS Bridging” and then make the settings as per the below instructions.
- SSID: Enter the SSID you have set up in the above process
- Password: Here enter the password which you have set up above and then click on the Next button and then on the next step simply click on the Finish button and this will make all the changes.
Now you are all done with the setup of the Mercury router here and this will hardly take 5 quick minutes for you to configure the router once again.
What is the Default IP for Mercury Router Login?
The Mercury Router has designated 192.168.1.1 as their Wifi Mercury Router Default Login IP address for accessing the admin panel, and they have kept the default IP in their user guides and on the Mercury Router.
What is the Default Username for Mercury Router Login?
The Mercury Router Username is ‘admin’ for entering into the Mercury Router Panel, and the default admin username can be changed by the admin.
What is the Default Password for Mercury Router Login?
The Mercury Router password is ‘admin’ for entering into the Mercury Router Panel, and the default admin password can be changed by admin.
How do I configuration of Mercury Router device?
If the administrator password is lost or forgotten, the only method to get access to the web management system is to reset the Mercury Router configuration to factory defaults. Users can press and hold the reset button for at least 20 seconds to reset the password.