Microrouter Router Setup: Another peculiar router company from the United States is well known for being a cost-effective router company. We have seen router companies all over the world with different variants of different models in various price ranges but what makes Microrouter special is that they offer the least of products but the pricing is really measurable and all the products have different features. So, it means every product they release has an upgraded version such as dual gain bandwidth and so on, which makes it worthy to put your money into it.
One of their latest models Microrouter 900I is the best one right now because it comes with better speed performance, effective bandwidth usage and the pricing is reasonable that has made it a market success as well. If you own an old router or a new one from Microrouter, then you will find this article helpful because we will discuss the router configuration and the settings process that you would find useful.
How to setup Microrouter Router – Configuration Guide
Prerequisites for the configuration of the router is that you have to check the power supply and ethernet cable management is properly connected and working, so you may swiftly follow the guide below to configure the router in a notch of time.
IP Login Process: Simply follow the steps below to log into the admin panel of the router directly.
- In the first step, you have to open the IP address 192.168.1.1 into the address bar from any of the selected browser from either laptop or computer
- In the second step, simply press go or click on continue which will now load the login page and now enter the username and the password, as admin and 1234 respectively
- Then cross check the login credentials and then simply click on the login button at the bottom of the page, which will now give you access to the web configuration admin panel.
Microrouters Internal Configuration Process – Wireless Connection Setup Guide
Now that you’ve got the access to the router, it is time for the main task to begin which is the process to configure the wireless connection and more.
Basic Wireless Settings: Under the Basic settings page from Setup, you will have to make the changes as per below instructions.
- Band: Select “2.4 GHz (B+G+N)”
- Mode: This should be AP
- SSID: Enter your router network name here
- Channel Width: Select “20/40MHZ”
- Control Sideband: Select “Upper”
- Channel Number: Select “Auto”
- Radio Power: Select “High”
- Associated Clients: Select “High” and then click on Apply Changes option

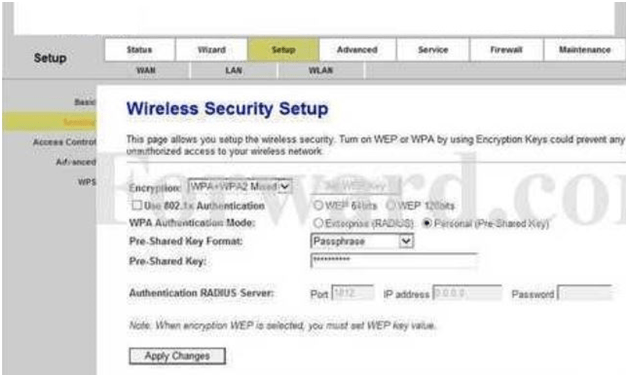
Security Settings: In the Security settings page, make the changes given as per the below steps.
- Encryption: Select “WPA+WPA2 Mixed” option
- WPA Authentication Mode: Select the “Personal (Pre-Shared Key)” option
- Pre-Shared Key Format: Select the “Passphrase” option
- Pre-Shared Key: Enter your password here and then click on the Apply Changes button.
Finally, you have now easily configured the Micro router and this took about some time but the next time you follow the instructions, it will be easier to configure this brand’s router.
What is the Default IP for Microrouter Router Login?
The Microrouter Router has designated 192.168.1.1 as their Wifi Microrouter Router Default Login IP address for accessing the admin panel, and they have kept the default IP in their user guides and on the Microrouter Router.
What is the Default Username for Microrouter Router Login?
The Microrouter Router Username is ‘admin’ for entering into the Microrouter Router Panel, and the default admin username can be changed by the admin.
What is the Default Password for Microrouter Router Login?
The Microrouter Router password is ‘1234’ for entering into the Microrouter Router Panel, and the default admin password can be changed by admin.
How do I configuration of Microrouter Router device?
If the administrator password is lost or forgotten, the only method to get access to the web management system is to reset the Microrouter Router configuration to factory defaults. Users can press and hold the reset button for at least 20 seconds to reset the password.