NetGenesis Router Setup: NetGenesis is well known to be among the top e-Business companies in the world and they not only focused on Internet products but produced all products related to the Internet and computer networking. But as the trend grew, their popular product became routers and modems which were extensively used in homes, offices, educational institutes, and even big IT companies as well. I would say the reason their products were valued in the market was due to their performance when it comes to speed, effective usage of bandwidth, and price which is reliable.
How to Configure NetGenesis Router setup process
If you own a router from NetGenesis then you can learn from the below instructions on how to configure any router model from this brand easily.
IP Login Process: First you will have to go through the steps below which shows you the ways to access the web configuration panel.
- First, open your browser and then go to the address bar where you have to type 192.168.1.1 or else copy/paste the IP address
- Next, you will see the login popup appear, and here for both the username and the password enter “naadmin” and then click on the login button
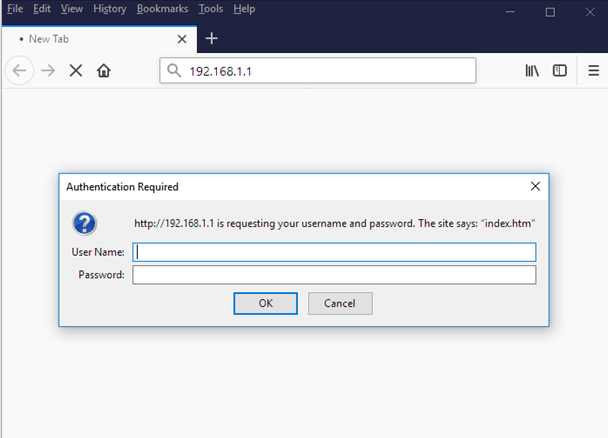
This will get you access to the NetGenesis admin panel.
Router Wireless Configuration Process – Step by Step Internal Setup
Once you have the access to the admin panel which is also called the web configuration panel, the further steps are to configure the router by following the steps.
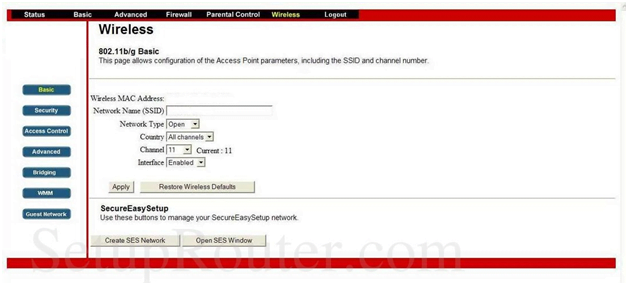
Basic Wireless Settings: From the top menu section click on Wireless and then click on Basic from the left sidebar and make the changes as per instructions below.
- Network Name (SSID): Enter your router network name here
- Network Type: Select the “Open” option
- Country: Select the “All Channels” option
- Channel: Select the “11” option
- Interface: Select the “Enabled” option and then click on Apply button
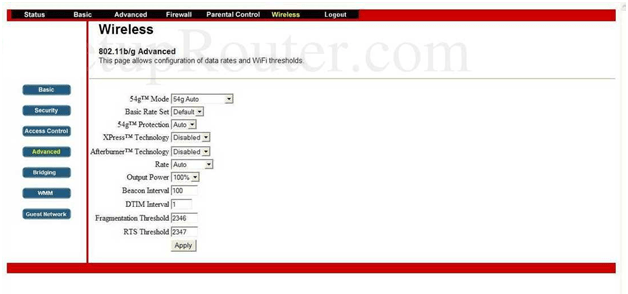
Advanced Wireless Settings: Click on Wireless from the top menu section and then click on Advanced from the left sidebar and then make the settings as per the changes below.
- 54gTM Mode: Select “54g Auto” option
- Basic Rate Set: Select “Default” option
- 54gTM Protection: Select “Auto” option
- XPressTM Technology: Select “Disabled” option
- AfterburnerTM Technology: Select “Disabled” option
- Rate: Select “Auto” option
- Output Power: Select “100%” option
- Beacon Interval: Enter “100”
- DTIM Interval: Enter “1”
- Fragmentation Threshold: Enter “2346”
- RTS Threshold: Enter “2347” and click on Apply button
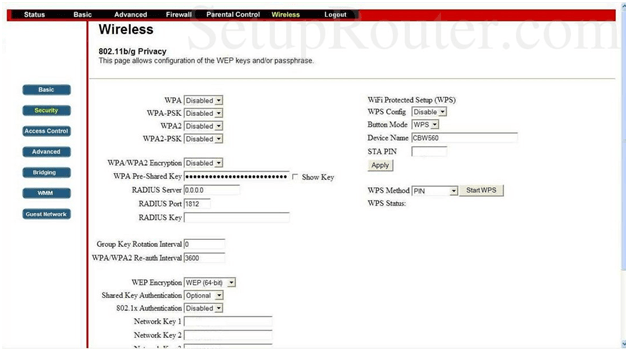
Security Settings: Click on Wireless from the top menu section and next click on Security from the left sidebar and then make the changes as per the below suggestions.
- WPA/WPA2 Encryption: Select “Enabled” option here
- WPA Pre- Shared Key: Enter your password here and this should be at least 8 characters long
- RADIUS Server: Enter “0.0.0”
- RADIUS Port: Enter “1812”
- WEP Encryption: Select “WEP (64-bit)” option
- Shared Key Authentication: Select the “Optional” option
- Network Key 1: Enter your password here again and then click on Apply button one final time
Finally, you have now successfully configured the NetGenesis router in very quick times and made sure to properly set up the router.
What is the Default IP for NetGenesis Router Login?
The NetGenesis Router has defined their Wifi NetGenesis Router Default Login IP address 192.168.1.1 to login the admin panel, and they have maintained the default IP at their user manuals along with stick a label on the NetGenesis Router.
What is the Default Username for NetGenesis Router Login?
The default admin username may be created by the admin, and the NetGenesis Router Username is ‘naadmin’ for logging into the NetGenesis Router Panel.
What is the Default Password for NetGenesis Router Login?
The default admin Password may be created by the admin, and the NetGenesis Router password is ‘naadmin’ for logging into the NetGenesis Router Panel.
How do I configuration of NetGenesis Router device?
If the administrator password is lost or forgotten, the only method to get access to the web management system is to reset the NetGenesis Router configuration to factory defaults. Users can press and hold the reset button for at least 20 seconds to reset the password.