Netstar Router Setup: Netstar routers are well known for being performance-based but at the same time the prices are low which is one of the reasons why they are one of the finest routers companies in the United States. This company also produces switches, modems, and different wireless communication and networking devices. While performance is good, the effective bandwidth usage is seemingly good as well which makes the router all-round performance-based and that is why we are going to discuss the Netstar router configuration process.
Configure Router and setup process
Netstar has various router models but all of them have the same web configuration process which is why the below guide can help you configure any router model from this company.
IP Login Process: Follow the steps mentioned below to learn how to get access to the web configuration panel of the Netstar router and then you can proceed towards the configuration process.
- Open a browser and then go to the address bar > Enter the IP Address 192.168.1.1
- Then click on the go or else click on the enter button and this page will reload to give login page
- On the login page, you will be asked to enter your username and the password login credentials
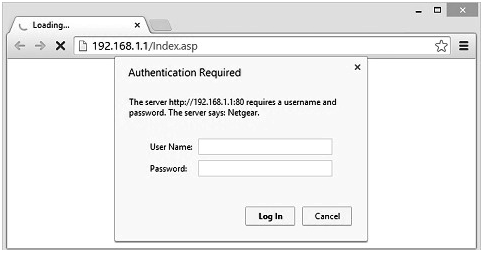
- The username is admin and the password is netstar
- Enter the above details and click on the Login button which will give you access to the Netstar admin panel
Netstar Router Wireless Configuration – Internal Settings
On the homepage of the router, you will find all the tabs on the top menu section and among them, you have to click on the Wireless and then on this page make the changes below.
Basic Wireless Settings: In this section make the changes as instructed and these are basic settings that will enable the wireless connection.
- Wireless Mode: Select “Access Point” option
- SSID: Enter your router network name here and you can name this anything as per your choice
- Country Code: Select your country from the drop down options available
- IEEE 802.11 Mode: Do not select or make any changes to this option
- Channel Width: Select “20 MHz” option
- Channel Shifting: Select “Disabled” option
- Frequency, MHz: Select “Auto” option
- Extension Channel: Select “None” option
- Frequency List, MHz: Do not enable this option
- Auto Adjust to EIRP Limit: Select this option
- Output Power: Enter “20” here
- Max TX Rate, Mbps: Select “MCS 7 – 65” option and check “Automatic” option besides it
Wireless Security: In this section, we will make the changes to the security and password for restriction unauthorized access to the router network.
- Security: Select “WPA-AES” option
- WPA Authentication: Select “PSK” option
- WPA Preshared Key: Enter your password here and this can be as per your own preference but make sure that the password should be at least 8 characters long minimum.
- MAC ACL: Do not check “Enable” option.
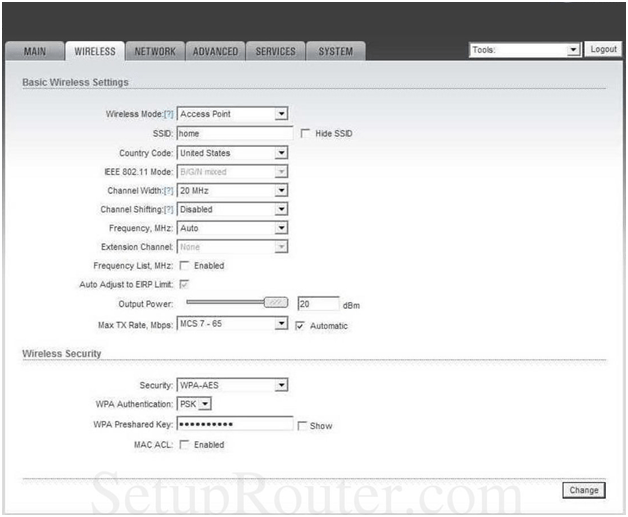
Finally, click on the Change button at the bottom of the page, and in this way, you can configure the Netstar router easily by following the above instructions!
What is the Default IP for Netstar Router Admin Login?
The Netstar Router has designated 192.168.1.1 as their Wifi Netstar Router Default Login IP address for accessing the admin panel, and they have kept the default IP in their user guides and on the Netstar Router.
What is the Default Username for Netstar Router Admin Login?
The Netstar Router Admin Username is ‘admin’ for entering into the Netstar Router Admin Panel, and the default admin username can be changed by the admin.
What is the Default Password for Netstar Router Admin Login?
The Netstar Router Admin password is ‘netstar’ for entering into the Netstar Router Admin Panel, and the default admin password can be changed by the admin.
How do I change/Reset the admin username or password of Netstar Router device?
If the administrator password is lost or forgotten, the only method to get access to the web management system is to reset the Netstar Router configuration to factory defaults. Users can press and hold the reset button for at least 20 seconds to reset the password.