Niksun Router Setup: Niksun is a United States network security and performance company that is known for creating various computer networking solutions and products that are used across homes, offices, and companies. We have different routers released by this company with features that vary from each that makes their models unique. They have features like dual gain bandwidth and different frequencies for better speed performance along with effective usage of the bandwidth. In this article, we will be discussing the process to configure the Niksun router through the guide below.
How to Configure Niksun Router setup process
So assuming that the proper hardware connection is made, then you will have to go over the login process below and this is necessary as you will have to access the dashboard first and then configure.
- Step 1: Open your laptop or computer, then after that go to the browser and then in the address bar enter the IP address 192.168.1.1
- Step 2: After that go on the click option or else on the enter button, this will now load the login window on the same tab
- Step 3: Simply enter the login details and for this company, the username and the password are admin and niksun respectively
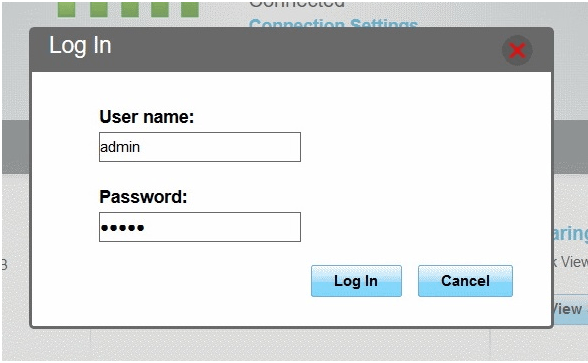
- Step 4: This will now load the Niksun web configuration panel through which further settings can be done.
Niksun Router Wireless Configuration – Internal Settings
Once you have access to the web configuration panel, simply go over the steps below which will show you the wireless settings.
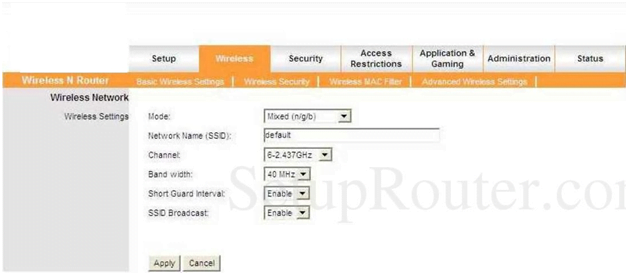
Basic Wireless Settings: Click on the Wireless option from the top and then under it click on Basic Wireless Settings and make the below changes.
- Mode: Select “Mixed (n/g/b)”
- Network Name (SSID): Enter a name for the router network here and you can name it as per your own wish and preference.
- Channel: Select “6-2.437Ghz”
- Band Width: Select “40 MHz”
- Short Guard Interval: Select “Enable”
- SSID Broadcast: Select “Enable” and then click on the Apply button
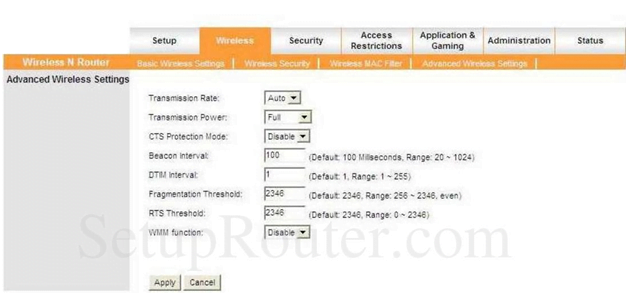
Advanced Wireless Settings: Go to the Wireless tab and then under this click on Advanced Wireless Settings, and on this page change the settings as per the instructions below.
- Transmission Rate: Select “Auto”
- Transmission Power: Select “Full”
- CTS Protection Mode: Select “Disable”
- Beacon Interval: Enter “100”
- DTM Interval: Enter “1”
- Fragmentation Threshold: Enter “2346”
- RTS Threshold: Enter “2346”
- WMM Function: Select “Disable” and then click on the Apply option
Wireless Security Settings: Click on the Wireless option again from the top menu section and this time click on Wireless Security and make the changes as shown below.
- Security Mode: Select “WPA-PSK”
- Encryption Method: “TKIP”
- Passphrase Format: “ASD”
- Passphrase: Here you have to enter your password for the router network and this can be a combination of alphabets, numbers, special characters except for spaces. Also, make sure that the password is no less than 8 characters small and no more than 64 characters long.
- Key Renewal: Enter “1500”
- Under Wi-Fi Protected Setup, Enable: Check this option and finally click on the Apply button
In this way you will be able to configure the Niksun router by following the above guide.
What is the Default IP for Niksun Router Admin Login?
The Niksun Router has designated 192.168.1.1 as their Wifi Niksun Router Default Login IP address for accessing the admin panel, and they have kept the default IP in their user guides and on the Niksun Router.
What is the Default Username for Niksun Router Admin Login?
The Niksun Router Admin Username is ‘admin’ for entering into the Niksun Router Admin Panel, and the default admin username can be changed by the admin.
What is the Default Password for Niksun Router Admin Login?
The Niksun Router Admin password is ‘admin’ for entering into the Niksun Router Admin Panel, and the default admin password can be changed by admin.
How do I configuration of Niksun Router device?
If the administrator password is lost or forgotten, the only method to get access to the web management system is to reset the Niksun Router configuration to factory defaults. Users can press and hold the reset button for at least 20 seconds to reset the password.