Perle Router Admin Setup: Well known as Perle Systems is a world supplier of all the Internet-related technology from Ethernet cables, I/O cables to modems and routers of all kinds. They also produce the routers themselves which has made them a huge supplier and a great company in the field of Computer networking and technology solutions. All the routers available from this company are known essentially for having the core basic features of accommodating more ethernet ports for more wired devices to be connected. While at the same time embracing the wireless feature with providing better dual gain bandwidth optimization that increases the speed performance overall to a high level that fans would like to use.
How to Configure Perle Router – Perle Router settings guide
If you have made the hardware setup then I am sure you might want to get ahead and complete the whole setup in quick time and that is why below process is listed down that includes from login to the complete configuration, so even a newbie can follow this process.
- The router login process remains the same as any other router because the login interface is quite the same as shown below.
- Open the browser as per your own preference and then in the address bar enter or else type in the IP address 192.168.1.1
- Then as usual, the login will appear and this time the username should be admin, and for the password enter superuser
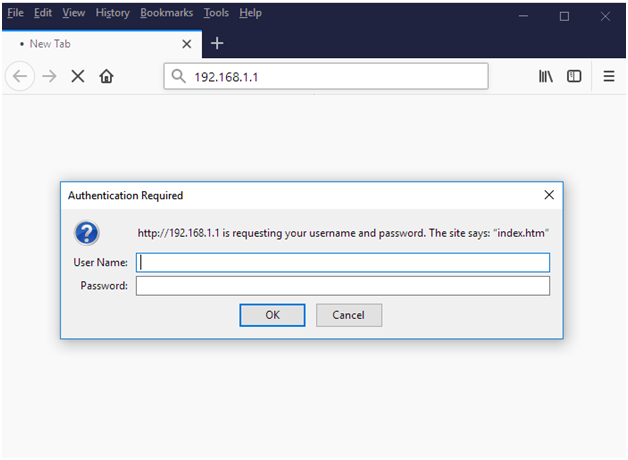
- Make sure again that the details are correct and the password is in lowercase and then click on the login button below these details
- This will now load the admin panel which is the homepage for your router through which the further settings can be done.
Perle Router Wireless Configuration Process – Internal Setup Guide
It might seem hard at first when you try to configure any router but to help you ease up the process we have made sure to include each and every step below for you to configure this router.
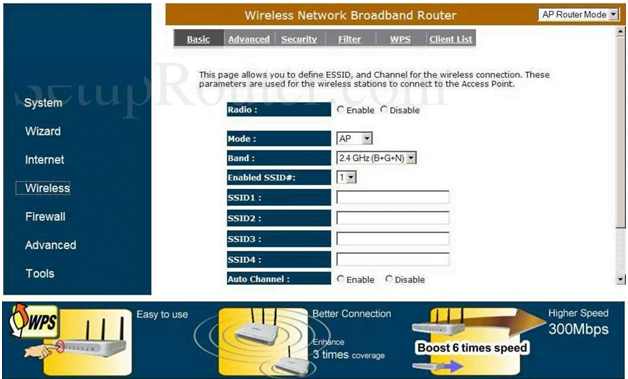
Basic Settings: Click on Wireless from the left sidebar and then click on Basic on the top menu section and make the changes to the page as shown below.
- Radio: Select “Enable” option
- Mode: Select “AP”
- Band: Select “2.4Ghz (B+G+N)” option
- Enable SSID#: Select “1” from the drop down menu
- SSID1: Enter the password here since this selected in above option
- Auto Channel: Select “Enable”
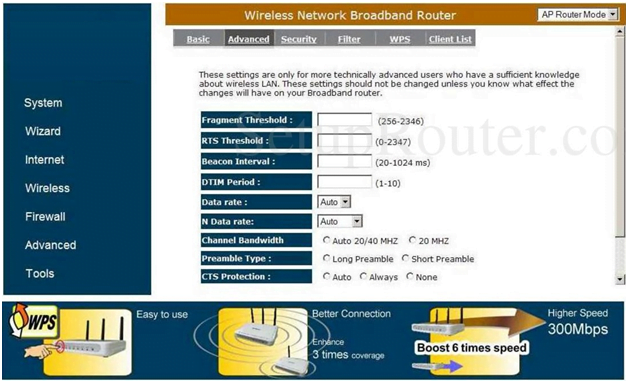
Advanced Settings: Click on the Advanced option from the top menu section after clicking on Wireless from the left sidebar and then make the settings as per the instructions shown below.
- Fragment Threshold: Enter “2346” here
- RTS Threshold: Enter “2347” here
- Beacon Interval: Enter “100” here
- DTIM Period: Enter “10” here
- Data rate: Select “Auto” option
- N Data Rte: Select “Auto” option
- Channel Bandwidth: Select “Auto 20/40 MHZ” option
- Preamble Type: Select “Long Preamble” option
- CTS Protection: Select “Auto” option
Security Settings: Select security settings option and make the changes shown below.
- ESSID Selection: Select the name of the SSID you want to add security
- Broadcast SSID: Select “Enable” option
- WMM: Select “Enable” option
- Encryption: Select “WPA RADIUS” option
- Authentication Type: Select “Open System”
- Key Length: Select “64-bit” option
- Key type: Select “ASCII” option
- Default Key: Select “Key 1”
- Encryption Key 1: Enter the password here
It might take some time for you to follow the above Perle Router Admin setup guide at first but after going through it thoroughly, you will be able to configure the Perle in less time and a lot easier as well.
What is the Default IP for Perle Router netadmin Login?
The Perle Router has designated 198.168.1.1 as their Wifi Perle Router Default Login IP address for accessing the netadmin panel, and they have kept the default IP in their user guides and on the Perle Router.
What is the Default Username for Perle Router netadmin Login?
The Perle Router netadmin Username is ‘admin’ for entering into the Perle Router netadmin Panel, and the default netadmin username can be changed by the netadmin.
What is the Default Password for Perle Router netadmin Login?
The Perle Router netadmin password is ‘superuser’ for entering into the Perle Router netadmin Panel, and the default netadmin password can be changed by netadmin.
How do I change/Reset the netadmin username or password of Perle Router device?
The only way to admin access to the web management system if the admin password is lost or forgotten is to reset the Perle Router settings to factory defaults. To reset the password, the user must push and hold the reset button for at least 20 seconds.