RICOH Router Admin Setup: RICOH is an American computer networking and technology solutions company that is well known for creating widespread router systems for big IT industries and they also have a lineup of routers that are made for homes, houses, small scale factories, institutes and companies as well.
Their router models are of different eloquent designs which is one of the things that have made and set them apart from other routers in the market. Among all the routers they have made, all have the same admin panel and even the interface for router configuration.
So, in this article, we will be using one of the router models in order to show you the process to configure the RICOH router.
How to setup and Configure RICOH Router – RICOH Router Setup Process
RICOH router is quite easy to set up because it has a well-made user interface for the web configuration panel but for the first time, no one can easily configure the router. But before we get into the configuration panel, learn the process to log into the RICOH router from the steps below.
- Step 1: Open a browser and in the address bar, enter the IP address 192.168.1.1 and then click on enter or the go option to continue
- Step 2: SImply, you can see that the login window will appear and you need to enter the asked details
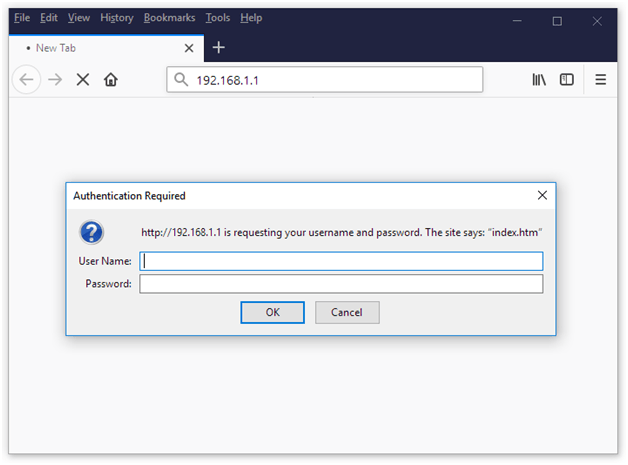
- Step 3: The asked details are username and password, which will both be admin, and once you enter both the details click on the login button at the bottom of these options and you will now have the access to the web panel homepage for configuration.
RICOH Router Internal Configuration Guide – Wireless Settings step by step
One of the most important settings to be made is the wireless settings and in the below guide you will learn how to configure the router precisely.
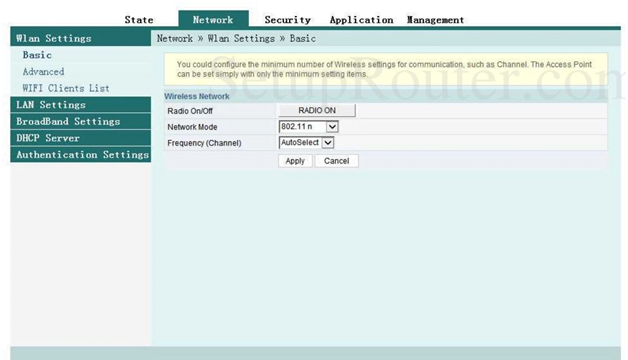
Wireless Basic Settings: From the homepage, click on Network from the top menu and then click on Wlan settings under which click on Basic and make the changes as shown below.
- Radio On/Off: Click on “RADIO ON” option
- Network Mode: Select “802.11 n” option
- Frequency (Channel): Select “Auto Select” option
- And then click on the Apply option to continue
Wireless Advanced Settings: Click on Network and from the left sidebar click on Advanced option and then follow the instructions as per below settings.
- Under Select SIID, SSID Choice: Select the “1” option and then select the “Enable” option
- look Under SSID, SSID Name: You can enter a name for your router network here and make sure it should not be more than 32 characters long
- Under Security Policy, Security Mode: Select the “WPA-PSK” option
- Next Under WPA(Wi-Fi Protected Access), WPA Algorithms: Select the “AES” option
- Pass Phrase: Enter a password for your router network here and make sure the password is between 8 to 64 characters
- Key Renewal Interval: Enter the “0” option and then simply click on the Apply button
After following the above instructions you can simply configure the RICOH router in no time even if it’s your first time following this guide.
What is the Default IP for RICOH Router Admin Login?
To access the RICOH router’s web-based user interface, type 192.168.1.1 (the most common IP for Ricoh routers) into your web browser’s address bar.
What is the Default Username for RICOH Router Admin Login?
The default admin username may be created by the admin, and the RICOH Router Admin Username is ‘admin’ for logging into the RICOH Router Admin Panel.
What is the Default Password for RICOH Router Admin Login?
The default admin Password may be created by admin, and the RICOH Router Admin password is ‘blank’ for logging into the RICOH Router Admin Panel.
Are the settings for the wireless LAN access point correctly configured for RICOH Router?
Check that the WPS function is not set to “inactive” or “Off” and functions other than WPS may interfere with the WPS function depending on their settings. For details, refer to the manuals for the wireless LAN access point.
Is an Ethernet cable connected for RICOH Router?
If the machine is connected to the network using an Ethernet cable, the Ethernet connection is enabled. To use the wireless LAN, disconnect the Ethernet cable from the machine.