Netopia Router Setup: We have seen many companies that were exceptional and one among them was Netopia which was well known for producing all the Computer networking and solution-related products used by homes to large companies. They produce modems, routers, gateways, WiFi routers, and other WiFi-related devices that were of high efficiency. Though this company is not there now, the products are still in the market and for those users who own the Netopia router models, this guide would be a perfect chance to learn more about the ways to configure the router from the start by following this guide. Also, note that this is a sub-company for Motorola and is now owned by them under their name itself.
Netopia Router Configuration Process – Step by Step setup guide
Before you get into the main wireless configuration, you should have access to the admin panel and that can be achieved by going through the steps mentioned below.
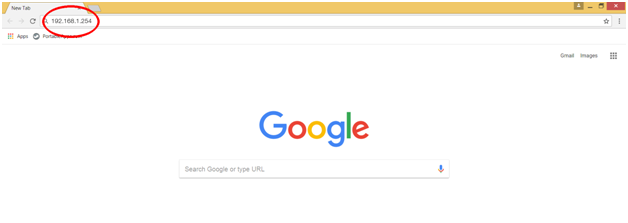
- Step 1: Open a browser from either your laptop or the computer which is connected to the router via the Ethernet port. And then type the IP address 192.168.1.254 into the address bar of the selected browser
- Step 2: Then click on the go or the enter button which will load the login page and here in the username you have to enter admin and for the password as well enter admin
- Step 3: Then simply click on the login button which is present below the login boxes and once done you will now have the access to the Netopia router admin panel.
Router Wireless Configuration – Internal Settings
After having the access to the web configuration panel, it is time to configure the internal settings further to enable wireless and more as shown below.
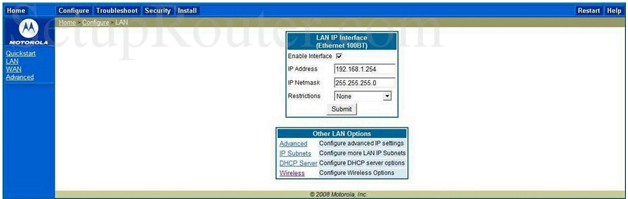
- LAN Interface Setting: Click on LAN from the left sidebar and then make the changes as per the instructions below.
- Enable Interface: Check this option
- IP Address: Enter “192.168.1.254”
- IP Netmask: Enter the “255.255.255.0” option
- Restrictions: Select “None” option and then simply click on the Submit button for the changes to take place
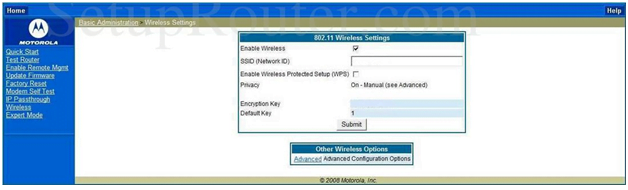
Wireless Settings: Then click on Wireless from the left sidebar and after that make the below settings.
- Enable Wireless: Check this option
- SSID (Network ID): Enter your router network name and this can be at least 64 characters long
- Enable Wireless Protected Setup (WPS): Do not check this option
- Encryption Key: Enter your password for the router here and this can be a combination of numbers, alphabets, and special characters as well.
- Default Key: Enter the “1” number here and then click on the Submit button
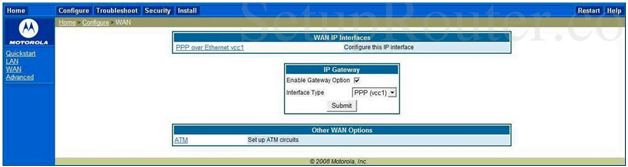
WAN IP Interface Setting: Click on WAN from the left sidebar and then make changes as per the given instructions below.
- Enable Gateway Option: Check this option
- Interface Type: Select “PPC (vcc1)” option
- Once done click on the submit button one final time and the changes will be saved
In this way you will be able to configure the Netopia router and make the settings by following the above instructions.
What is the Default IP for Netopia Router Login?
The Netopia Router has defined their Wifi Netopia Router Default Login IP address 192.168.1.254 to login the admin panel, and they have maintained the default IP at their user manuals along with stick a label on the Netopia Router.
What is the Default Username for Netopia Router Login?
The default admin username may be created by the admin, and the Netopia Router Username is ‘admin’ for logging into the Netopia Router Panel.
What is the Default Password for Netopia Router Login?
The default admin Password may be created by admin, and the Netopia Router password is ‘admin’ for logging into the Netopia Router Panel.
How do I change/Reset the admin username or password of Netopia Router device?
If the administrator password is lost or forgotten, the only method to get access to the web management system is to reset the Netopia Router configuration to factory defaults. Users can press and hold the reset button for at least 20 seconds to reset the password.