Pirelli Router Admin Setup: Pirelli might be well known as one of the world’s famous tyre companies but the fact that they have a router company with the same name is known to ones in the Computer networking and technology industry well. But this does not mean that they are not entirely focused on this market because their router models prove otherwise. All their routers are essentially designed in order to provide the eloquent look and also the flexibility of compact size which all modern days gadgets hold. While their features are on par with the market standards with speed performance never low and usage of bandwidth a highly effective feature of theirs.
How to Configure Pirelli Router – Pirelli Router Setup Process
Looking at their router models, they all have the same interface which is why in this article we will be showing you the simple steps to configure one of their popular router models. In this way, though the router changes the process remains the same and you can implement the configuration steps from this guide below.
- Open the browser and then enter the IP address 192.168.1.254 into the address bar and simply hit the enter button or else click on the go option directly from the browser
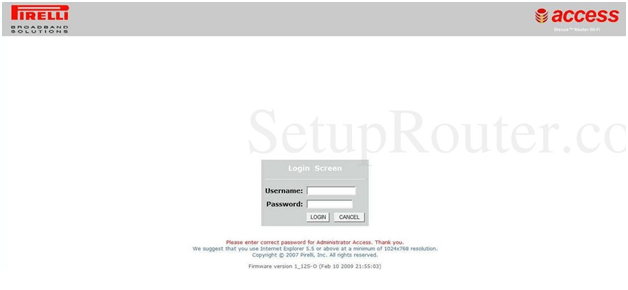
- After that you can see that the login window will appear and here you just have to enter the login credentials in the asked places
- In the username you will need to enter admin and for the password you have to enter pirelli
- Finally click on the login button which is present just below these details and you will get access to their admin platform
Pirelli Router Wireless Settings – Internal Settings
Well, we now have access to the internal control panel and then working on the internal settings to enable the wireless settings and doing the further configurations might not be so hard if you follow the steps mentioned below.
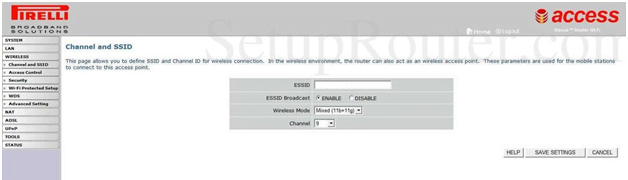
Channel and SSID: Click on Wireless from the left sidebar and then click on this page to make the settings as per the below instructions.
- ESSID: Enter the name for your router’s network here and this can be a name that can be as per your own preference
- ESSID Broadcast: Select “Enable” option
- Wireless Mode: Select “Mixed (11b+11g0” option
- Channel: Select “9” and then simply click on the Save Settings button
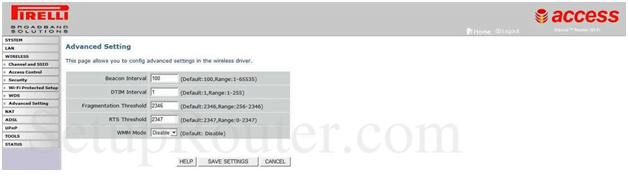
Advanced Setting: From the left sidebar click on the Advanced Setting option under the Wireless and then make the changes as per the setting given below.
- Beacon Interval: Enter “100”
- DTIM Interval: Enter “1”
- Fragmentation Threshold: Enter “2346”
- RTS Threshold: Enter “2347”
- WMM Mode: Select “Disable” option and then click on the Save Settings button
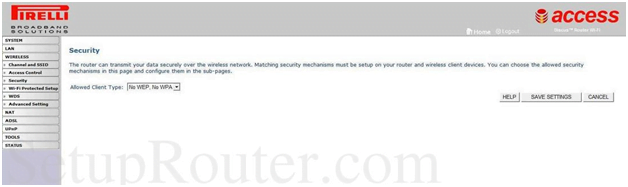
Security: Under the Wireless from the left sidebar this time click on Security option and on this page you have to follow the instructions and make the changes given below.
- Allowed Client Type: Select “No WEP, No WPA” option and then password option will appear
- Then enter the password and click on the Save Settings option finally to make the changes
Simply follow the above Pirelli Router Admin instructions and once you are done with the guide then you have easily configured the Pirelli router.
What is the Default IP for Pirelli Router netadmin Login?
The Pirelli Router has defined their Wifi Pirelli Router Default Login IP address 192.168.1.254 to login the netadmin panel, and they have maintained the default IP at their user manuals along with stick a label on the Pirelli Router.
What is the Default Username for Pirelli Router netadmin Login?
The Pirelli Router netadmin Username is ‘admin’ for entering into the Pirelli Router netadmin Panel, and the default netadmin username can be changed by the netadmin.
What is the Default Password for Pirelli Router netadmin Login?
The Pirelli Router netadmin password is ‘admin’ for entering into the Pirelli Router netadmin Panel, and the default netadmin password can be changed by netadmin.
How do I change/Reset the netadmin username or password of Pirelli Router device?
If the admin password is lost or forgotten, the only method to get access to the web management system is to reset the Pirelli Router configuration to factory defaults. Users can press and hold the reset button for at least 20 seconds to reset the password.