NAI Router Setup: NAI router company is known for their well designed router models and they also have quite exceptional features as well. But the design is something which everyone has found interest in and their features are good for a company like NAI. They are not precisely costly but at the same time this does not mean or tag them as different router companies which do not provide great features. Their routers have precise settings and their web configuration panel is something easy to manage. In this guide today we will go across the process in which you will learn the steps to configure the NAI router.
How to Configure NAI Router – NAI Router Setup Process
In this article we will be using the NAI Entercept router model and their login credential details to show you the primary step to access the admin panel.
- First open either your laptop or computer which is connected to the router via the ethernet cable
- After that, open any preferred browser and then click on the address bar where you have to type in or copy or paste the IP address 192.168.2.1

Note: Every router company has their own IP address which is called an Internal IP address which is used to login to the Web GUI for the router configuration.
- Now you can see that there will be a login popup where you have to enter the username as admin and the password as admin123
- Then simply go to the bottom of the page, click on the login button and this will get you the access to the router’s admin panel
NAI Routers Internal Settings Guide – Wireless Configuration
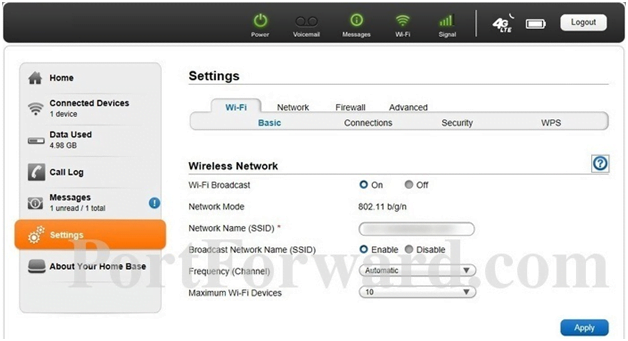
Wi-Fi Basic Settings: Go to the Settings option from the left sidebar and then click on the Basic option under the Wi-Fi settings from the top menu section and make the changes as per the below instructions.
- Wi-Fi Broadcast: Select “On” option
- Network Mode: This will be “802.11 b/g/n
- Network Name (SSID): Enter your router network name here
- Broadcast Network Name (SSID): Select “Enable” option
- Frequency Channel: Select “Automatic” option
- Maximum Wi-Fi Devices: Select “10” and then click on Apply button
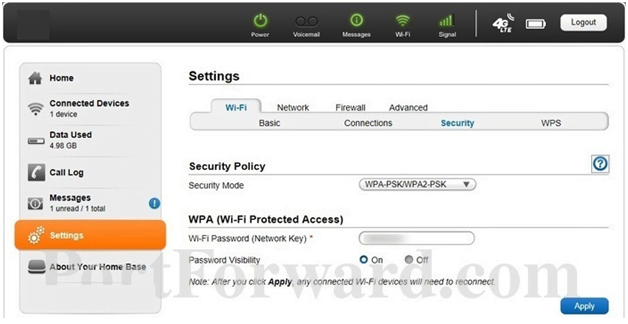
Wi-Fi Security Settings: Click on the Settings option from the left sidebar and then click on Wi-Fi option from the top menu section and after that click on Basic option and make the changes as per below settings.
- Under Security Policy, Security Mode: Select “WPA-PSK/WPA2-PSK” option
- Under WPA (Wi-Fi Protected Access), Wi-Fi Password ( Network Key): Enter your password for the Router network here
- Password Visibility: Select this option if you want to view the password while adding in above step and then finally click on Apply button
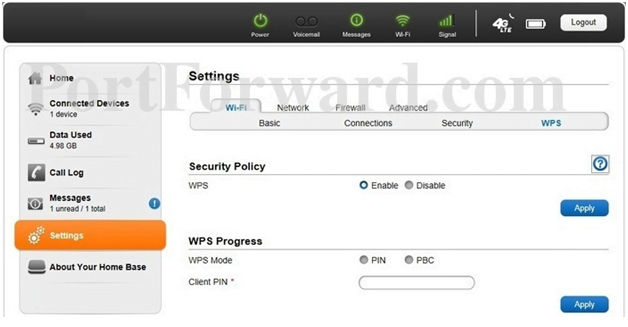
Wi-Fi WPS Settings: Click on the Settings option from the left sidebar and then click on the Wi-Fi option from the top menu section and then click on WPS option under which you have to make the settings changes as per the below instructions.
- Under Security Policy, WPS: Select “Enable” and click on Apply button
- Under WPS Progress, WPS Mode: Select “PIN”
- Client PIN: Enter any number as per your preference and click on Apply button
Finally you have now configured the NAI router from the above instructions in less than 5 minutes and you can follow the same to configure wireless settings.
What is the Default IP for NAI Router netadmin Login?
The NAI Router has defined their Wifi NAI Router Default Login IP address 192.168.2.1 to login the netadmin panel, and they have maintained the default IP at their user manuals along with stick a label on the NAI Router.
What is the Default Username for NAI Router netadmin Login?
The default netadmin username may be created by the netadmin, and the NAI Router netadmin Username is ‘admin’ for logging into the NAI Router netadmin Panel.
What is the Default Password for NAI Router netadmin Login?
The default netadmin Password may be created by netadmin, and the NAI Router netadmin password is ‘admin’ for logging into the NAI Router netadmin Panel.
How do I change/Reset the netadmin username or password of NAI Router device?
If the admin password is lost or forgotten, the only method to get access to the web management system is to reset the NAI Router configuration to factory defaults. Users can press and hold the reset button for at least 20 seconds to reset the password.