Micronet Router Admin Setup: Micronet is very well known for being the world’s most leading when it comes to Cameras and Switches that are used all across the world for different purposes. But they also have their own router products which are pretty well known as well and are really reliable that makes them worthy to use indeed. We have seen different router brands come up with a lot of features, but what makes Micronet different is that they focus on the ability of the router to be consistent to perform with good speed performance, price has been low which has made them really a good product in the market for the general audience. In this article, we will be going over the SP916GK router to perform the configuration process.
How to setup Micronet Router – Micronet Router Configuration Process
Every router has their own web configuration interface and even this brand has their own, which has similar login process but the setup settings are different which you will get to know from the below steps.
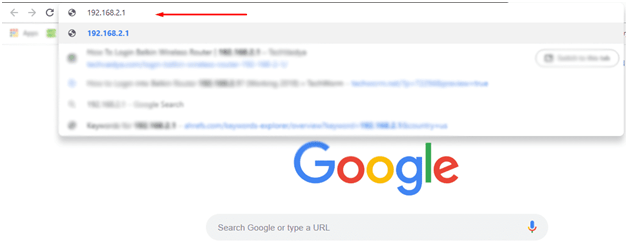
- Step 1: Open any browser either from your laptop or computer, then simply head to the address bar and then either type or enter the IP address 192.168.2.1
- Step 2: Now simply press on the go button on the address bar or click on the enter button which will now load the login page and here you’ve got to enter the required login credentials that are asked
- Step 3: On the login page, under the username enter admin and for the password enter 1234, then simply head to the bottom and click on the login button which will now load the admin panel directly
Micronet Router admin Wireless Configuration Guide – Internal Setup Process
Now that you’ve got the access to the web configuration panel, you can follow the instructions below to configure the router directly.
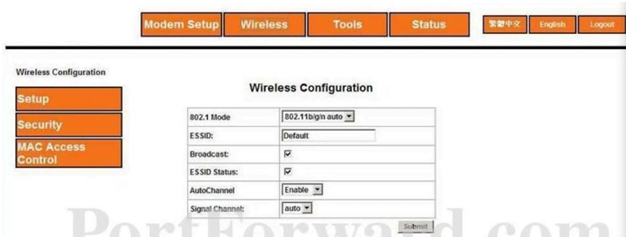
Wireless Configuration: Go to the Wireless option from the top menu section and then click on it, which will load the Wireless Configuration page and from there select the Setup option and then make the changes as per the instructions below.
- 802.1 Mode: Select “802.1b/g/n auto” option
- ESSID: You have to enter your router’s network name and this can be anything which can be as per your own preference. While the name can be a combination of all characters like alphabets, numbers and special characters as well.
- Broadcast: Select this option
- ESSID Status: Select this option
- AutoChannel: Select “Enable” option
- Signal Channel: Select “auto” option and then click on the submit button to make the changes
Wireless Security: Now from the same page of Wireless which you opened by clicking on Wireless option from the top menu section, click on the Security from the left sidebar and then make the required changes as shown below.
- Select an SSID and its Wireless Security level: Select “SSID#1” option here
- Then select “WEP” option
- Authentication Type: Select “Both” option
- Cipher: Select “WEP-128bit” option
- Select the “Alphanumeric (5,13 cahracters)“
- Encryption Key: Here enter your password and select a password while making sure it follows the password instructions and guidelines below, then click on the submit button and you have configured the router.
Finally, we have now setup the Micronet router completely and you will be able to do the same configuration process by going over the instructions from above.
What is the Default IP for Micronet Router Admin Login?
The Micronet Router has defined their Wifi Micronet Router Default Login IP address 192.168.2.1 to login the admin panel, and they have maintained the default IP at their user manuals along with stick a label on the Micronet Router.
What is the Default Username for Micronet Router Admin Login?
The default admin username may be created by the admin, and the Micronet Router Admin Username is ‘admin’ for logging into the Micronet Router Admin Panel.
What is the Default Password for Micronet Router Admin Login?
The default admin Password may be created by the admin, and the Micronet Router Admin password is ‘1234’ for logging into the Micronet Router Admin Panel.
How do I change/Reset the admin username or password of Micronet Router device?
If the administrator password is lost or forgotten, the only method to get access to the web management system is to reset the Micronet Router configuration to factory defaults. Users can press and hold the reset button for at least 20 seconds to reset the password.