Origo Router Setup: Origo is a part of the SISK group which is well known for being one of the best consumer companies in the world and they also have a good lineup of routers that they have produced over time. In this article, we will be discussing the features of routers from this company in brief and then explain to you the main steps required to configure this router which is the important part of this guide. All their routers are known for being designed nicely, next their features include dual gain bandwidth with double frequency along with speed performance which is really high, and then their routers can also use the bandwidth effectively.
How to Configure Origo Router – Origo Router setup guide
Let’s assume that you have set up the router’s hardware which might take some time for starters but once you are done with it, then you need to learn the process to log into the admin panel through which we can make the settings and configuration directly.
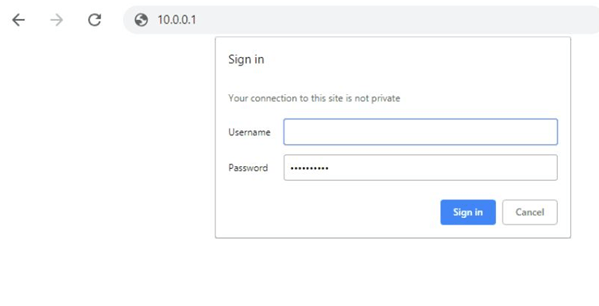
- First, open your browser and then go to the address bar, then type the IP address 10.0.0.1 and click either on the go or else on the enter button from the keyboard
- In the next step, you can see the browser will load the login window on the same page and there you can see username and password as the required credentials

- Now in the login window, for the username enter admin, and then for the password, you will have to enter admin1234 and then click on the login button
Origo Router Wireless Configuration Guide – Internal Settings
Now that we have the router in place and the access to the web configuration panel is on then you have to follow the steps mentioned below which will help you enable the wireless settings and configure the router.
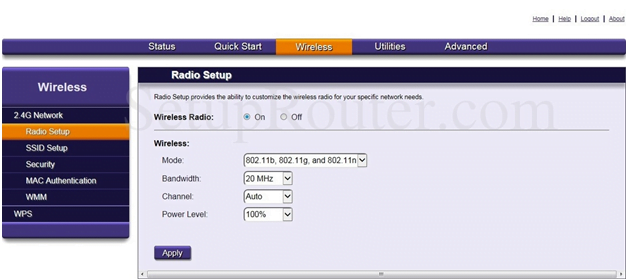
Radio Setup: Click on the Wireless option from the top menu section and then click on Radio Setup from the left sidebar to make the below settings.
- Wireless Radio: Select the “On” option
- Under Wireless, Mode: Select the “802.11b, 802.11g, and 802.11n” option
- Bandwidth: Select “20Mhz”
- Channel: Select “Auto”
- Power Level: Select “100%”

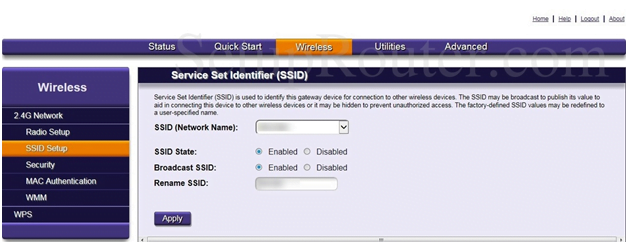
SSID Setup: From the left sidebar click on SSID Setup and then make the changes as shown below.
- SSID (Network Name): Select the SSID from the drop-down list
- SSID State: Select the “Enabled” option
- Broadcast SSID: Select the “Enabled” option
- Rename SSID: You can enter a new name for the selected SSID as per your own preference and then click on the Apply button

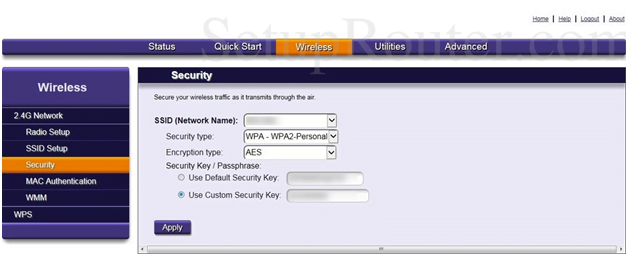
Security: Once you have clicked on the Wireless option from the top menu section and then click on Security from the left sidebar to make the changes as per the below settings.
- SSID (Network Name): Select the SSID which you have set up in the SSID Setup step
- Security Type: Select “WPA-WPA2-Personal” option
- Encryption type: Select “AES’ option
- Security Key / Passphrase: Select “Use Custom Security Key:” and then enter a custom password here which can be as per your own preference as well and then simply click on Apply button

Finally you have now configured the Origo router by following the above guide.
What is the Default IP for Origo Router Login?
The Origo Router has defined their Wifi Origo Router Default Login IP address 10.0.0.1 to login the admin panel, and they have maintained the default IP at their user manuals along with stick a label on the Origo Router.
What is the Default Username for Origo Router Login?
The default admin username may be created by the admin, and the Origo Router Username is ‘admin’ for logging into the Origo Router Panel.
What is the Default Password for Origo Router Login?
The default admin Password may be created by the admin, and the Origo Router password is ‘admin1234’ for logging into the Origo Router Panel.
How do I change/Reset the admin username or password of Origo Router device?
If the administrator password is lost or forgotten, the only method to get access to the web management system is to reset the Origo Router configuration to factory defaults. Users can press and hold the reset button for at least 20 seconds to reset the password.